Changelog
Follow up on the latest improvements and updates.
RSS
The Eventive dashboard Box Office now supports scanning a customer's pass or membership QR code with a USB 2D barcode scanner to instantly start a Passholder/Membership Reservation. In addition to entering a customer's pass or membership by name, your box office staff can now scan the QR code from the customer's pass or membership and have all the relevant information populated automatically.
This is especially useful for busy will-call lines, member check-in tables, or any high-volume box office setting where speed and accuracy matter. Scanning removes the need to search by name, reducing errors caused by similar names, unnamed passes, or long dropdown lists.

See our newest help article to learn more about scanning membership and pass QR codes to automatically apply benefits in the dashboard box office.
Barcode scanning is available for the dashboard box office in both POS Mode and Web Mode and functions the same in both layouts.
This feature will work with any USB connected 2D barcode scanner. See our Hardware Recommendations.
Memberships on Eventive now support a user-confirmed renewal option in addition to auto-charging. While auto-charging is often the most desirable option for members and organizers, you can now allow members to confirm their renewal before their payment card is charged. Rather than being charged automatically at renewal time, members receive a notification email with a call-to-action link and must actively confirm their renewal before the charge is processed.
This is especially useful for high-priced memberships, 3D Secure payment workflows, or any situation where you want explicit member consent before a charge is made.

How to enable User Confirmed Renewal:
Navigate to your membership bucket settings, open the General tab, scroll to the Recurrence section, and select "User confirmation required" under Renewal Type. Note that this setting is permanent and cannot be reversed once saved.
This feature is available to all organizers at no additional charge.
For full details on how User Confirmed Renewal works, including how to configure your notification emails, visit the Help Center: User Confirmed Renewal for Membership Buckets.
This same feature is also available for Recurring Passes.
This update applies to the Eventive Scanner App and dedicated Eventive Scanner hardware.
When using the scanner to issue instant tickets by scanning a pass QR code, the intended behavior is that if any pass-restricted ticket buckets exist, the instant ticket scan will automatically pull from the designated ticket bucket.
An issue with a previous scanner app update had caused instant ticket scans to default to the first ticket bucket in the event list, requiring a workaround of re-ordering ticket buckets while we addressed the issue.
It's our pleasure to let you know that this feature has now been fixed. The Eventive Scanner App and Eventive Hardware scanners draw tickets properly from pass-restricted ticket buckets, regardless of the order of the ticket bucket list in each event.
This fix supports the use of multiple pass restricted ticket buckets, so that you can separately control allocations for different pass types as needed.
This fix is live and no update to the Eventive Scanner app is required.

For more information on Instant Tickets and Pass Restricted Ticket Buckets, see the following Resources in the Eventive Help Center:
If you're hosting an Eventive Virtual livestream or real-time broadcast, you can now download a full transcript of the livestream chat directly from the Livestreaming Hub - making it easier than ever to revisit and reference your audience's conversation after the event.

What's included:
- All chat messages with the sender's name and timestamp
- Messages that were deleted from the chat are noted in the transcript — the sender and time are preserved, but the original message content is not recoverable
How to use it:
Navigate to the livestreaming hub and locate the desired livestream or real time broadcast and click "Manage livestream". From Manage livestream, scroll down to the event's Live Chat Management section and click the Download Chat Transcript button to export your chat log as a .txt file.
This feature is available to all organizers at no additional charge.
Two new articles are available in the Eventive Help Center:
Long film and event titles in the schedule grid are now fully visible in an easy "tool-tip" view. Hovering over any tile in the grid will reveal a pop-up showing the full title alongside a description, giving your audience the context they need to decide what to watch.
The pop-up pulls in the most relevant description available. If your event has its own description, that takes priority. Film short descriptions appear alongside it, separated by a vertical bar for easy scanning. If there's no event-level description, the film short descriptions stand on their own. And if no short descriptions exist, the full-length film descriptions are used.
For more information on the schedule views, including Grid view, please visit our article "Configurator: Schedule Tab" in the Eventive Help Center.

We now offer the ability to search for an order based on the last four digits of the card used to make the purchase. This new tool allows you to efficiently find an order so you may add an email address or person record to the order, initiate a transfer, exchange tickets, or issue a refund. This is particularly handy for orders where the customer name or email address is unknown, including box office and box office app orders where the customer did not provide an email address, rush pay orders, or online guest checkout.
This search tool is available in the Orders section of each event bucket and in your Global All orders page. Launch the search by clicking the button that says "Search by card last 4"

For more information, please see our new Help Article, "Search for an order using the Last 4 Digits of the Credit Card Number."
new
improved
The Membership Module
Our new membership module gives you more control.
Eventive has always offered robust membership management tools using pass buckets. Now memberships have their own space on your dashboard in the new membership module.
With the Eventive membership module, you can now create membership options and track member data separately from passes using Membership Sales Analytics, Membership Ticket Analytics and Membership Status Analytics.
The membership module:
• Allows you to create and maintain memberships and member data in a new dedicated section on your Eventive dashboard.
• Creates a membership sales page on your Eventive native site, separate from your pass sales page.
• Comes with its own set of analytics that allows you track membership sales, renewals and redemption trends separately from pass sales and redemptions.
Whether you already host memberships through Eventive or would like to add this important feature, all you have to do to start is go to your event bucket settings > site features > toggle on ‘membership module enabled.’

You only need to enable the membership module in one of your event buckets. Benefits will be applied across all your event buckets using global membership rules.
Any existing memberships currently hosted in the pass buckets section as recurring passes may be easily migrated to the membership module by going into ‘general’ pass bucket settings > advanced > clicking ‘Migrate pass bucket to membership.’

Check out our extensive collection of guides on how to set up your memberships in the Help Center.
You can also book a special
15 minute office hours meeting
with a member of our Customer Success Team to talk over questions!Membership tips and best practices
Use these ideas as you build out your new or existing membership program:
- Host memberships in one event bucket. Typically it is best to host them in the event bucket where you create and promote your year-round programs. This way, all data and management remains continuous from year to year.
- Routinely clean up membership rules once they’re no longer in use, this saves confusion amongst seasonal staff and allows for quicker loading of rules.
- Offer quantity price breaks and dual memberships for multiple purchases.
- Drive interest and year-round revenue with special sales or exclusive offers.
- Enable Gift Membership, it’s a great way to encourage year-round gifting. In your general membership settings, click “allow memberships to be purchased as gifts.”
NOTE:
You are not required to activate the membership module right away. In fact, you do not have to migrate existing memberships until you are ready - or ever! While this upgrade is an improvement to our membership offerings, it does not affect current functionality. However, the Membership Module provides the added benefit of being able to build, sell and analyze the performance of your membership program separately from any other pass product(s) that you are offering.
To improve admin user experience when working with multiple pass rules in a pass bucket, we have added a streamlined
summary display for each pass rule
, along with the option to name your pass rules
.In addition to the previously existing options for pass rule functions, we've added a customizable Rule Name field that you can use to identify your pass rules at a glance.
Use the Rule Name field to describe what your pass applies to and what the rule is meant to do. This will help you organize and curate the rules for your passes and memberships so that they are ordered properly an apply to your current events, screenings and items. Adding meaningful and descriptive pass rule names will also help with pass rule troubleshooting.

To simplify access to pass rule auditing and editing, we have changed the display of pass rules within pass bucket settings. Instead of seeing every pass rule editor fully open on the pass rules page, you will see a summary display that includes a listing of the key functions of the pass, along with the Pass Rule Name.
To open an existing pass rule for editing or expanded viewing, you'll simply click the
EDIT
button on the summary view, then save (or simply close if there are no changes) when finished. Editing the pass rules individually
and displaying a summary of each pass rule
along with a pass rule name
on the pass rules settings page will make it easier to get an overview of multiple pass rules, prevent accidental editing of the wrong pass rule and help improve load time for the pass rule editor in cases where there is a large number of pass rules targeting across multiple event buckets. 
For more information on recent updates to pass rule creation please refer to the following articles:
new
Audience Experience
Apple Pay & Google Pay now available for physical event ticketing
We’ve updated our physical event and pass checkout payment options to match virtual event payment options.
Of note, the upgraded payment pathway now supports Apple Pay and Google Pay.
When using a compatible browser on a supported device that has Apple Pay or Google Pay configured properly, customers will be presented with the option to pay using Apple Pay or Google Pay at Checkout.
Apple Pay should be visible in Safari on a Mac, iPad or iPhone.

Google Pay should be visible in Chrome on Android devices that support Google Pay.

Other payment methods that are now available with the Unified Payment Pathway include; iDeal, Bancontact and P24. Please note that some payment methods (like iDeal) are regionally specific and require the use of a specific currency as your primary currency. For more information on additional payment methods, please reach contact our support team from your Eventive Dashboard.
new
improved
Hide Tags from Public View
Tags have always been useful for classifying and sorting your films and screenings. They help your customers navigate your schedule, film guide and virtual catalog. Tags have also been great for tabulating ballots in smaller groupings for specific competitions.
The uses for tags on Eventive are ever growing, particularly in the areas of data-driven decision making and CRM/marketing integrations.
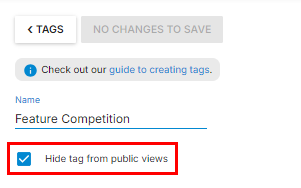
This new feature allows you to hide selected tags from your Eventive native site. Now you can create tags for strictly internal uses and those tags will not appear on your schedule or on your film guide.
A tag can be hidden by going to the tag manager section of your admin dashboard and selecting "Hide tag from public views"
NOTE: If a tag that is hidden from public views is used as a display section on the Virtual Catalog, the display section will still be visible to your audience. If you are interested in controlling the visibility of your display sections and virtual screenings, please reach out to Eventive support and ask about controlling visibility by pass type.
Load More
→